


 |
| fresh baked bread with humus and chicken |
-

Thai streetfood
-
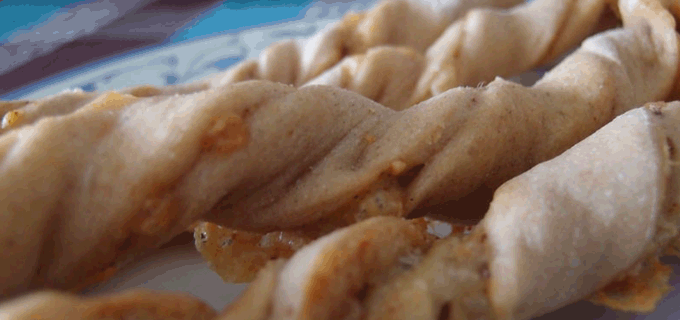
Puff pastry cheese sticks
-

Fusion curry chicken
-
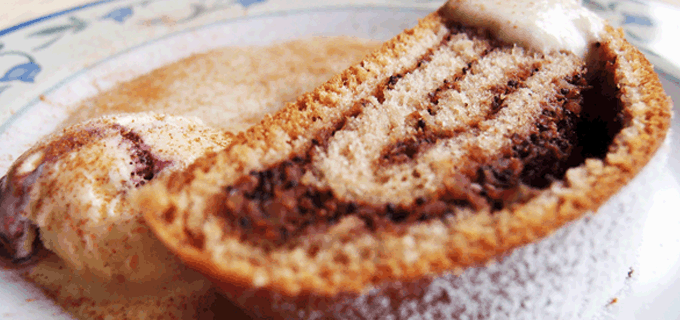
Poppy seed strudel
-
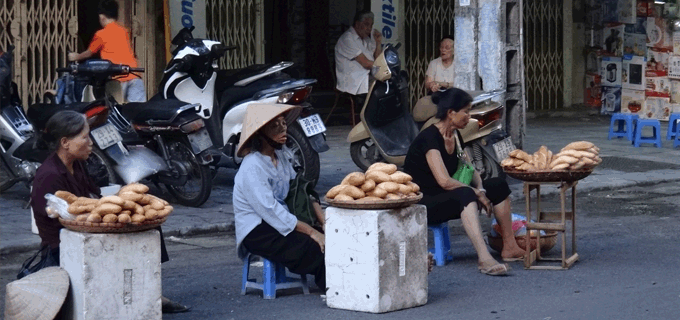
Vietnamese sandwich seller
Blogger inspired arabic night with chicken, humus and fresh bread
Minze Zitronen Träufel Kuchen - Mint Lemon Drizzle Cake
 |
| Leckerer beträufelter Kuchen |
Review of the Bite Club street food festival in Berlin
 |
| MS Hoppentosse / Bite Club |
So for me it was a nobrainer to go and discover this festival in Berlin.
Ein gemischter Brot Fladen fuer Götz mit Lavendel - a mixed flour bread for Götz with lavender

Als Karen neulich das Schloss von Götz besucht hat, war Sie vor allem sehr enttäuscht von dem Brot dass Ihr zum Frühstücke serviert wurde. Da Sie eine begnadete halb professionelle Bäckerin ist, rief Sie alle Hobby Bäcker und Blogger auf dem Schloss unter die Schultern zu greifen. Anstatt dem lächerlichen Industriebrot, dass es zum Frühstück gab, sollte es doch auf diesem stolzen und historischen Gemäuer bessere ein Brot geben dass einen tapferen Ritter stolz machen kann.
Ninive's blueberry rolls with marzipan - Blaubeer Rollen der Ninive mit Marzipan

Die Ninive hat mich in Ihrem Blog inspiriert mal was Anständiges aus meinen Blaubeeren im Kühlschrank zu machen. Was denn nur? Ein paar Blaubeere Rollen nach Ninive’s Schwedischer Art. Ich muss eh etwas vorbereiten und heute Abend ist das Spiel, also schnell die restlichen Blaubeeren aus dem Kühlschrank geschnappt und zu diesem leckeren Gebäck verarbeiten. Ideal für den Sommer, einen großen Fußballabend und auch als Willkommensgebäck. Also schnell noch mal das Rezept angeschaut, ein bisschen modifiziert und frisch ans Backwerk.
Strawberry cherry basil danish – Erdbeer Kirsch Basilikum Plunder
 |
| Danish fresh from the oven |
asparagus gazpacho - my football meal
 |
| Gazpacho plated up with croutons |
Barbaras Spielwiese: Tonkabohnen-Eis
 |
| Das leckere Tonka Bohnen Eis von Barbara! |
Barbara bedankt sich auf Ihrer Spielwiese für die Taiwanesische
Rindfleischsuppe welche ich Ihr mal gemacht habe. Dafür hat Sie mir dieses
leckere Eis gemacht. Ich freue mich schon darauf, denn bei ca. 35 Grad im
Schatte ist ein schönes Eis genau das
richtige. Hier geht es zum Rezept.
Rindfleischsuppe welche ich Ihr mal gemacht habe. Dafür hat Sie mir dieses
leckere Eis gemacht. Ich freue mich schon darauf, denn bei ca. 35 Grad im
Schatte ist ein schönes Eis genau das
richtige. Hier geht es zum Rezept.
kohlrabi pesto with a fresh summer salad
 |
| kohlrabi pesto on spagetthi |
Foodzeit in Kenya - impressions
 |
| Elephant taking a bath |
Foodzeit in Ethiopia - where coffee was invented - a story about awesome food and good bread
 |
| big plate with rice, tibs, doro wat, injera and chili paste |
Und jetzt brauch ich wirklich Eure Hilfe, ich würde mich freuen wenn von Euch jemand das Rezept von dem Brot kennt das Ihr sehen könnt. Für Details bitte gerne weiterlesen.
Hier sind einige Nationalgerichte abgebildet:
- Doro wat - eine Art Hähnchen geschmort in einer pikanten und würzigen Soße
- Tibs - eine Art von gebratenem Fleisch mit Gemüse
- Injera - ein Fladenbrot mit einer großen, schwammartigen Oberfläche
Asapargus risotto Berlin style - Beliner Spargel Risotto
 |
| Das Risotto festlich hergerichtet |
Blog event - Lieblingslöffel / my favorite spoon: Spaghetti Bolognese
 |
| Spagetti Bolognese with green bean salad |
Ich fange heut
gleich mal mit einem Regelverstoß an. Es geht heute um das Thema Lieblingslöffel.
Das ist das gleichnamige Thema zu welchem Zorra von kochtopf.me und Petra vonObers trifft Sahne in diesem Blogevent aufgerufen haben. Da habe ich sofort meine Löffel gespitzt und dachte bei mir:
Che, da machst Du auch mit. In dem Event sollen wir unsere „Liebling“ Löffel
zusammen mit einer selbstgekochten Speise zeigen. Leider, wie schon erwähnt, fange
ich gleich mit einem Fauxpas an. Eigentlich, wenn man den Anweisungen der puristisch
eingestellten Italienern folgt, würde ich für den folgenden Blogeintrag gleich
eine hinter die Löffel bekommen. Aber da ich nun mal schon mal damit angefangen
habe, muss ich wohl die Suppe auslöffeln die ich mir da eingebrockt habe. Ich
kann nur hoffen dass ich danach nicht den Löffel abgeben muss. Aber ich habe
nur mal eben die Weisheit auch nicht mit Löffeln gegessen und darum essen Spaghetti eben nun mal gerne mit Löffel, da kann man die einfacher aufdrehen und die Soße
spritzt nicht dauernd in der Gegend rum. Also Ich will Euch wirklich und ganz
ehrlich nicht über den Löffel balbieren wenn ich Euch sage dass ich auch nicht
mit dem goldenen Löffel im Mund zur Welt gekommen bin und darum werdet Ihr bei
mir auch keinen solchen finden, sondern nur einen ganz einfachen Metalllöffel
der eigentlich gar nichts Besonderes ist, aber das leckere Essen macht Ihn
hoffentlich zu was besonderem. Und was gibt’s? Spaghetti Bolognese! Uhhh wie
langweilig? Nein gar nicht. Was ist denn nur langweilig an einem Gericht dass
ich seit meiner Kindheit kenne und liebe und dass ich bis heute genauso koche
wie ich es von meiner Mutter gelernt habe? An einem Klassiker wie diesem ist nämlich
gar nichts langweilig. Also hier mein Gericht für Euch, lieben Zorra und liebe
Petra, zusammen mit dem erwähnten Löffel.
Stuffed turkey breast with bell pepper basil vegetable stew - Gefüllte Putenbrust mit Paprika Basilikum Gemüse
 |
| served stuffed chicken breast |
Kangaroo with asparagus and sauce hollandaise - Känguru mit Spargel und Sauce Hollandaise
 |
| Fertiges Steak mit Spargeln und Sauce Hollandaise |
Tja, wie schon berichtet war ich vor einiger Zeit in Australien unterwegs. Neben tollen Food Touren, dem Strand und anderen Erlebnissen, von denen ich hoffentlich hier noch berichten kann, war es natürlich keine Frage dass, wenn man nach Australien kommt, zuerst einmal ein Känguru sehen will. Desto grösser war meine Überraschung als ich erfahren habe dass man das auch essen kann. In Spezialitäten Metzgereien und einigen Supermärkten kann man Känguru und Wallaby (eine kleiner Art des Kängurus) kaufen, in bestimmten Bars, Pubs und Restaurants bekommt man diese Spezialität serviert. Diese Gelegenheit musste ich natürlich wahrnehmen und ich musste das natürlich probieren, keine Frage (Obwohl ich mich schon ein bisschen wie Andrew Zimmern gefühlt habe). Also ab in die Markthallen, ein schönes Steak eingekauft und heim in die Küche zum kochen. Hier kommen das Rezept und mein Geschmacksbericht.
Baking an olympic wheat sourdhough bread - Ich backe ein olympisches Weizenmischbrot mit Sauerteig

Sportnachrichten: Che Foodzeit nimmt an der ersten Plötziade 2014 teil.
Nach den Winterspielen im russischen Sotschi bilden den Höhepunkt im Food Blogger Kalender die nun anstehende Plötziade. Vom 8. März bis zum 17. April 2013 kämpfen die Athleten aus aller Welt in einer Disziplin um die Ehre dabei zu sein! Als erstes auf dem Plötziade Programm stand gleich die Königsdisziplin, ein Weizenmischbrot mit Sauerteig backen: Vor dem großen Event gaben die Veranstalter noch das Reglement bekannt.
Die Athleten sollen Ein Brot backen das aus den folgenden Zutaten bestehen MUSS:
Linsen Uttahpam, Indisch schwäbisch Italienischer Linsen Pfannkuchen - Lentils Uttahpam fusion style
 |
| Uttahpam with chili pesto |
Wir präsentieren stolz: Der allererste doppelte Liebster Blog Award - we proudly present: The first ever double favorite Blog award
 Wie ihr als fleißige Leser bestimmt alle schon mitgekriegt habt haben Ninive und Che Foodzeit kürzlich von Karen vom „Brot und Meer“ Blog den liebsten Blog Award bekommen. Ninive hat außerdem den Award auch noch von Boulancheriechen verliehen bekommen so dass Ihr Blog doppelt ausgezeichnet wurde!!
You as our eager readers will already know that Ninive and Che Foodzeit won a prize, Karin from Brot & Bread honored us with the "liebster Blog-Award" (most-loved blog) and as Boulangeriechen awarded me too- I'm (and feel) even doubly honored.
Diese „Liebster Blog Award“ Aktion gibt es nun schon seit langem und er macht immer mal wieder die Runde. Wer Lust hat, kann bei Brot und Meer eine tolle Zusammenfassung lesen in welcher steht woher diese Aktion stammt und wie diese sich im Lauf der Zeit entwickelt hat. Laut den Regularien sollten die Preisgekrönten die Ehre mit dem Award ausgezeichnet zu sein weitergeben; Ninive und ich haben unsere Kräfte vereint und uns zusammen getan um nun zum ersten Mal in der Geschichte den „Double Lieblings Blog“ Award weitergeben zu können. Diesen präsentieren wir hier nun stolz:
LIEBSTER BLOG AWARD - I won a prize :) !

I have been awarded with a German blogger award by Karin from the blog Brot & Meer. The award works like this. Somebody chooses his or her favorite food blog and awards it with this award. The awardee has to answer a set of question and in return choose a few other blogs to pass this honorable award on. I am much honored to receive this award from Karin who a semi-professional baker and a seasoned blogger with two blogs in German and in English, with a longstanding and great reputation in the blogosphere and I will humbly and happily answer all her questions in the following blog post. As this is a German Award, the whole thing will be in German and I will not translate it in English this time. Please like always, use the Google Chrome inbuilt translation function that works wonderful with all webpages that are written in foreign languages.
G'day mate - Foodzeit's OZ tour, today @ a culinary tour through the Yarra valley
 |
| Glass of wine with good cheese and a fabulous view What is more to wish for? |
Subscribe to:
Posts (Atom)